I’m so excited to bring you this Thrift Store Decor Upcycle Challenge! I’ve teamed up with 20 other bloggers for this thrift store blog hop. The rules were simple–take an item(s) from a thrift store, yard sale, resale shop etc. and transform it into a new piece of home decor. There was no budget or theme to stick to so we were free to let our creativity run wild!
Meet the Hosts

Amanda | The Kolb Corner Chelc| Inside the Fox Den
Erlene | My Pinterventures Kim | Made in a Day Sara | Twelve on Main
Emily | Two Purple Couches Shirley | Intelligent Domestications
Marie | DIY Adulation Lindsay | Crazy Organized Michelle | Our Crafty Mom
Julie | Live From Julie’s House Debra | Shoppe No. 5 Dru | Polka Dot Poplars
Maureen | Red Cottage Chronicles Pili | Sweet Things Channell | Hobnail House
Colleen | Life on Kaydeross Creek Ann | Duct Tape and Denim
Paula | Virginia Sweet Pea Sherry | Savvy Apron Stacy | Anastasia Vintage

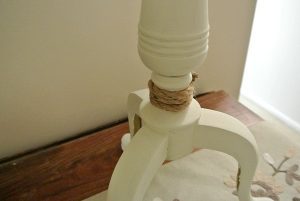
I found this nice heavy lamp and at our local thrift store for $5.00. I’m not a big brass fan, but saw the potential of something it could be that would work for me. I like the thin line of the lamp and how tall it is. I knew after I gave it a face lift it would be perfect for the space I had in mind for it. Here’s what I did:
Upcycled Lamp Supplies
- A Lamp 🙂
- A flat sided lampshade. (I found one at the thrift store. Not the one pictured above.)
- Chalk Paint
- Sponge Brush (This leaves a smoother finish on the brass.)
- Sandpaper
- A Lot of Paint Stir Sticks
- Glue Gun and Glue Sticks
- Stain (optional)

Upcycled Lamp Instructions
- Clean your lamp and lightly sand the surface to help the paint adhere.
- Brush on your first coat of chalk paint. Let dry. Chalk paint is known for how well it adheres to the surface of almost anything. I like the look of it over a spray paint.

After the first coat.
- Apply a second coat of paint and let dry.
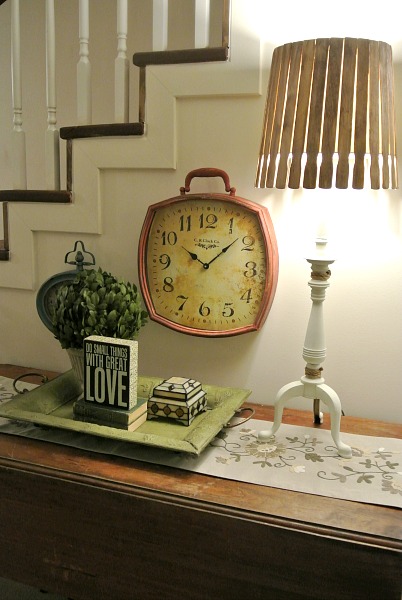
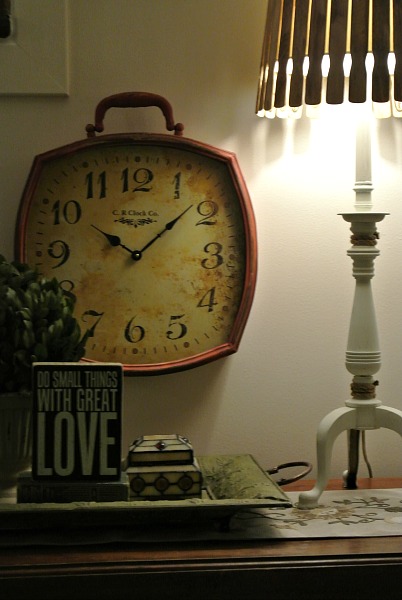
- For the shade you will need to find a flat sided one.
- Using your glue gun adhere each paint stir stick in place. If your shade is angled you will need to leave a small space between each stick.

- (Optional) Stain the sticks and let dry.
- I glued some jute rope in a couple of places on the lamp.
- Be careful with the lamp in the beginning. After a few days the paint will have cured and should hold up to use.

I love how it turned out and it only took about an hour total to make.
What kinds of things would you do to recycle a lamp? I’d love to see examples if you’ve already done one.


Dru, I love your lamp shade! This is so clever, and it made the lamp look like a totally different lamp.
Thank you so much Sherry. That so sweet of you.
LOVE the paint stick lampshade idea – Genius!
Julie, thank you.
Super cute and rustic! I love great conversation pieces!
Kim
Thanks Kim. It was super fun to make.
I NEVER would’ve thought that you picked that up at a thrift store! Love it!
I never would have either, but I loved the height and it is super heavy. I knew there were possibilities. Thanks so much.
What imagination you have! I love the new look you gave this lamp, especially the paint stirrer shade. Fun!
Thanks Paula. I love the way it turned out.
Love this lamp update! Can’t believe it was only $5! This was so creative.
Hi Michelle. Thanks. It’s so fun to see how inexpensively I can change something.
Wow I love this lamp. I keep meanig to paint the ones in my master bedroom. You have given me the inspiration. And the lamp shade is wonderful.
Debra, yay! I’m so glad you were inspired.
Wow! Lovin the stir sticks on the lamp shade. Your new lamp fits in perfectly with the rest of your table decor!
Thanks so much Amanda!
I love your lamp!! I would have never thought about using paint stir sticks for the lamp shade!
Thanks so very much.
Amazing makeover on this lamp! I’ve used paint sticks, too, for a lampshade makeover…can’t beat the price, right? lol love the lamp stand, too, it has feet! How fun! You knocked this project out of the park!
Oh Audra, you are so sweet! Thank you.
This is such an awesome makeover! I love the paint sticks on the shade – so clever!